The Basics of Laminate Floor Installation
You must do it right if you install laminate flooring in your home. Laminate is a natural wood product that needs time to acclimate to the environment and temperature of your home.
First, remove the old flooring and make sure the subfloor is in good condition. Next, install an underlayment that protects the laminate floor and adds insulation to your home.
The first step in installing laminate is ensuring your subfloor is clean and dry. Moisture can cause deterioration of your floor and may ruin your laminate flooring installation. You can use a Protimeter to measure the moisture content of your subfloor. It should be between 12% and 45% RH (Relative Humidity).
If you have concrete floors or other porous surfaces, the floor manufacturer will recommend installing a vapor barrier before you lay your laminate flooring. This barrier will prevent moisture from seeping into your floor and will also help to keep it from warping over time.
Next, prepare the room for installation by removing any furniture and other items that might be in the way of your work. This will prevent unnecessary delays in your laminate floor installation. It also allows you to set up equipment such as a drill or saw.
In most cases, you’ll need to remove existing shoe molding and baseboards as well. This will allow you to install the new laminate floors in a straight line. You can purchase a tool to help you do this, or you can hire someone else to take care of the task.
Regardless of the type of flooring you decide on, it’s important to leave a minimum 1/4″ space between the new floor and the perimeter walls so that the floor can expand with temperature changes. If the space is too close or the new flooring touches a wall, it can buckle in the middle and be damaged.
Once the area is ready, lay the unopened cartons of your laminate planks flat in the room to acclimate them to the humidity and temperature of the room for at least 48 hours before installation. Ideally, you’ll want the room to remain between 60 and 85 degrees Fahrenheit with a 35%-65% RH level for maximum comfort and longevity of your new floors.
Starting at the left corner of the room, begin the floor installation. As you work, leave a 1/4″ space between the laminate and the perimeter wall to allow for expansion.
Laminate flooring can be a great choice for many rooms in the home. It can give the room a clean, modern look and offer excellent durability. However, you should be aware that laminate floors do require an underlayment to prevent damage to the subfloor layer.
Before laying your underlayment, it’s important to make sure that the floor is level. If the concrete floor in the room has dips, you should level them with a floor leveling compound before installing the underlayment. Also, be sure to clean all dust and debris from the concrete surface before laying the underlayment.
To start the installation process, lay the first row of underlayment along a wall against where you plan to install your flooring. The underlayment should run up the wall around 2 inches. Trim the excess with a utility knife, then use tape or adhesive to stick it down.
Once the underlayment is in place, start laying your flooring on top of it. Work section by section, slowly and steadily moving forward.
Be sure that there is no gap between the underlayment and the wall, and be careful not to overlap the pieces when laying consecutive rows of underlayment. Tape the underlayment to keep it in place and to help it stay flat against the wall.
Some underlayments are made of foam, others are made of rubber or cork. While rubber can be a good option for sound reduction and moisture protection, it tends to be expensive.
Felt is another underlayment material that many installers prefer. Felt is a bit heavier than foam and is softer underfoot. It is a good choice for noise reduction and heat retention, though it does not fight moisture as well as rubber or cork.
When laying your underlayment, be sure to follow the directions on the package. Some have slightly different instructions than others, so be sure to read them thoroughly.
If you are installing your flooring on a plywood subfloor, it’s a good idea to use a vapor barrier before laying the underlayment. This will help keep the vapors that may be created during installation from seeping into the fiberboard of your floor, which can cause it to warp over time.
Laminate flooring is an excellent way to make a home look like new, and it’s easy to install on your own. It’s also very durable and can last for years. However, you should know the basics before you begin the project so that it goes smoothly and efficiently.
One of the first things you should do is measure your room. This will help you determine how much laminate planks you need. To do this, divide the linear footage of the room by the width of a single board. You should leave about 3/8-inch of space on each side for expansion and contraction.
Once you have this information, it’s time to cut the laminate floor into the correct size. You can use a hand saw, circular saw or flooring cutter to do this.
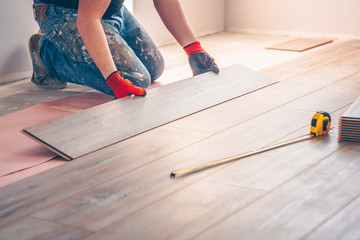
After cutting the planks to the appropriate length, you can start installing them. Begin with the tongue side of the plank facing the wall, and place the other half of the plank next to it. Align the tongue to the groove of the first plank and press it down until you snap it into place.
Repeat this process until you’ve finished the row. You can stagger the seams by starting at a corner of the room and working your way out to avoid a repetitive pattern that may make the floor look more uniform than natural.
When you’re done, you can trim the last plank to size before installing shoe molding or quarter round to finish off the floor. This will give your flooring a more finished appearance and prevent gaps from appearing between the planks.
Finally, you can seal any scuffs or holes with special crayons available at your local hardware store. This will give the flooring a more finished look and help protect it from moisture damage.
To ensure your floors are as secure as possible, you should always check the subfloor before laying the laminate. If you have a damp subfloor, it can lead to mold growth and other problems. To test for moisture, you can cover the floor with a 3-ft. square of plastic sheeting and wait 24 hours before peeling back the paper.
During the laminate floor installation process, you may want to add some finishing touches such as thresholds, baseboard and quarter-round moulding. This helps your flooring look more professional and enhances the overall design. It also protects the floor from stains and scratches.
Adding these touches is an easy way to give your flooring a finished look. It also makes the installation process easier and faster.
Once your underlayment is laid, you can start laying out the planks of your laminate flooring. Lay your first row parallel to the longest wall, starting at a corner and working towards the other end of the room. It’s important to ensure that the first row is straight so subsequent rows will fit correctly and look professional.
When laying your planks, be sure to stagger the end joints of adjacent boards by at least 6 inches for a more authentic appearance and better structural stability. This also prevents your flooring from separating and keeps close seams from buckling or breaking.
Then, use your hammer and tapping block to gently tap each plank snugly into place, ensuring the tongues of each board match up with the grooves in the next board. Be careful not to hammer too hard as this could damage the laminate surface or tongue.
Repeat this step for each row until you’re finished. If you’re installing laminate in a large space, use expansion spacers to provide a gap between the first and second row so the floor doesn’t warp with humidity changes.
After a few rows are installed, you can begin adding the moldings and trim to your floor. You can do this yourself or have your installer do it for you.
If you’re installing laminate in a high-traffic area, glue is recommended to secure the planks together and create a moisture barrier between them. Glue is available from the manufacturer or can be purchased at most home improvement stores.
When a laminate floor is installed, it’s best to allow the floor to acclimate for a few days. This helps the flooring to become more pliable and allows it to withstand humidity changes better. The best time to acclimate is during the day when it’s warm and dry. This can take 48 to 72 hours.